This is part 2 of the series. For part 1 see here.
Design a conversation
Here is a sample conversation.
Default flow:
User : Hey google tell me some inspiring quotes/motivational quotes/inspirational quotes
OR if the user knows the app already, he can ask by name
User: Hey google, talk to LitInspire
App: Welcome to Lit Inspire. With great quotes and inspiring passages, I will inspire you.
Here is a quote: Real Artists ship — This was said by Steve Jobs asking us to share our work with the world and not hold back.
Do you want to hear another quote?
User: Yes Please
App: here is another one . . Do you want to hear another one ?
User: Sure
App: Great. Here is another quote. . Do you want to hear another one.
User: No Thanks.
App: Hope you are inspired to take on your challenges. Have a good day!
The user could cancel at any time by saying cancel.
Create a project and define actions
To create the project you should first setup a project in the actions on google console.
Then choose a category which your app belongs to. It will show a form asking you to the select the default invocation phrase, i.e the name of the app the user can explicitly ask for and save.
Next click on the ‘actions’ menu and you will be prompted to build your first action. When you click on that you will be take to a menu with many built in actions and custom action. Built in actions help you to build apps based on template or you can customize later. Here we will proceed with a custom action. Select ‘custom action’ and click Build.
You will be redirected to the dialogflow console.
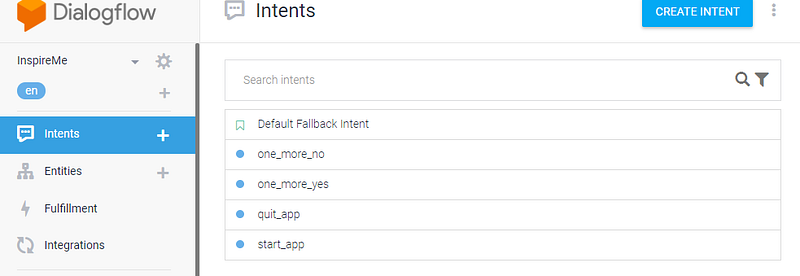
This is the agent which maps user queries to intents and invokes a specific action.
If you see the conversation above, the user first starts the app by asking for a specific quote or asking for the app by name.
So the initial intent could be start_app which is triggered when either asked by name of if google matches the invocation phrase (tell me an inspiring quote) to our app.
So create an intent with name ‘start_app’ and save
It gives options below to enter
contexts: Context is a way to link the conversation. Let us come back to this later.
events: Events are a way to enter the app without matched text. i.e a way to enter the app by calling by name. Select ‘Welcome’ and ‘Google Assistant Welcome’ which says that when users ask for this app by name, start_app intent is triggered.
actions and parameters: Specifies the action that should be triggered when this intent is specified. Dialogflow can also get ask questions to get all the parameters needed before fulfilling the action. So in this screen you can specify the action and also the parameter names to use later. For e.g if you want to listen a quote in a specific category, you can have that as a parameter. Currently the app just tells a quote in any category, so there is not paremeter in this app. So just specify an action name.
training phrases: Training pharses are phrases which the user can say to match this intent without asking for the app by name. for e.g tell me a motivating quote, tell me an inspiring quote, give me some inspiration, tell me a quote etc. Enter different varieties of training phrases all of the different ways a user can ask for quotes etc.
Responses: This section can be used to provide hardcoded responses. You can enter a few quotes here and they will be used if our service fails. If you want to end the conversation here, you can select, end this conversation slider. In this example we don’t want hardcoded response, so don’t select this.
Fulfillment: This is used if we want to create a fulfillment service which can provide user response instead of hard coding. Here in this example we want to use the fulfillment service. So select ‘Enable webhook call for this intent’. Later when we have the fulfillment service ready we can enter the fulfillment url in the fulfillment section.
This action will play the introduction and also return a quote. After that it asks user either to listen to another quote or quit. So we need two more intents one to handle when the user says ‘yes’ and one when user says ‘no’.
Contexts:Though there is only one question for which the user might answer yes here, the user might say ‘yes’ to different questions in conversation, but our app should know in which context the user said yes to. So when the user says ‘yes’ since the app knows the context the user is in, it will only match the action for that context not all the intents which have yes as a triggering phrase.
So create new intents one for one_more_yes and one for one_more_no.
In the one_more_yes, we want to listen to process the yes only if he says it in the one_more context i.e after he has listened to the first quote and wants to listen more. So in the contexts section, set the input context to one_more and save. Set the training phrases to be variations of the yes response like sure, absolutely, yes,please etc. Also enable webhook call for fulfillment. Set the action to be same as the intent name.
Do the same thing for the one_more_no intent. Set the input context to one_more and set the training phrases to variations of no and enable webhook call for fulfillment. Set the action to be same as the intent name.
Fallback intent: Next there may be times where the user might say something totally unrelated to the app and we should have a way of handling that. Google already provides a ‘Default Fallback Intent’. Open that and set an action name like input.unknown and enable fulfillment so that we can handle it in our service.
This should cover all the intents which are necessary for our app. Next lets build the fulfillment service.
Build fulfillment
The fulfillment service should accept a POST request from Dialogflow with the matched intent details. Your service should handled the request and return a response as per the Dialogflow V2 specification.
We could use any language for creating the service, but Dialogflow provides a NodeJS based fulfillment SDK which will make our job very easier. So we will be using the NodeJS SDK.
Our fulfillment service will be a Google Cloud fucntions for firebase . Cloud Functions for Firebase lets you automatically run backend code in response to events triggered by Firebase features and HTTPS requests. Your code is stored in Google’s cloud and runs in a managed environment. There’s no need to manage and scale your own servers.
Cloud Functions runs Node v6.14.0, so install node v6.14 or higher version.
Once nodejs is installed, set up the firebase cli following the instructions here
The steps are
- Install firebase-cli
- Initialize project firebase init and download dependencies
Once the project is initialized, we can develop our functions. Lets see how to install firebase-cli and how to develop fulfilment in the next part.
No comments:
Post a Comment
Comments