This is part of a multipart series.
Part 1
Part 2
Part 3
This is part 4.
Test the app
Once you have entered the fulfillment url, you can test either in the dialogflow console on the right side of the console or in google assistant.
To test in google assistant, click on ‘Integrations’ in the dialogflow console and select ‘Google Assistant’. On the next screen select ‘test’.
It will open up a test window like this.
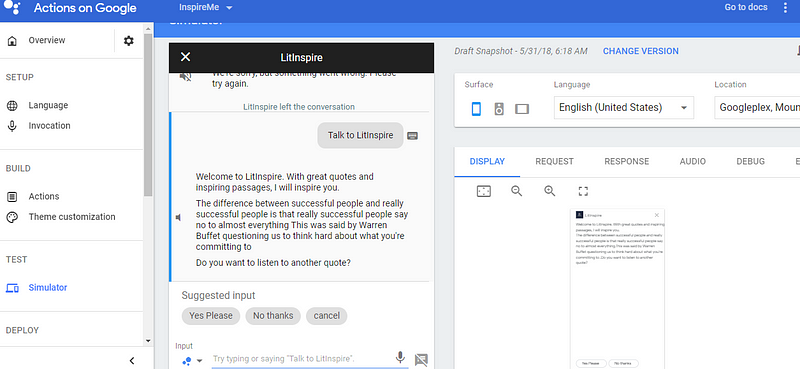
We can test each of your intent here. We can also see the request and response and any errors we might encounter.
For e.g. in this app, when I ask to ‘Talk to LitInspire’ , it will retrieve a quote and display on the simulator. It will also read the quote with appropriate pauses as specified in the SSML. It will also show the suggested replies. We can click on the suggested replies to test the next part of the conversation.
We can also view logs by following the link on the simulator. We can see the request and response and exception stack traces also. In the google cloud platform logs console, you can select the right application (actions on google app or the cloud function) to see the logs at the appropriate level.
Once we have verified the happy paths, the fallback paths and conversations and we are satisfied with the result, we can submit the app for approval.
Submit the app for approval
To prepare the app for approval, we have to provide more details so that the app can be visible in the directory. We can provide a short description, more details and invocation phrases to talk with the app.
We also have to provide images in two different sizes. I used the canva app to create these images. We have to provide a banner image and also a logo

Next we have to create a privacy policy.
Google provides a sample doc which we can copy and edit to create our own privacy policy. You can check my privacy policy here.
Next we can select the category the app belongs to and other details helpful for review. We can also select the countries where the app is available and also the devices which can use the app. Then we can submit the app for review.
The app will be reviewed and if there are no issues, the app will be deployed to production. We will get an email informing us of the same. That completes the process of building and deployment.
Summary
In summary we have seen how to design, build and deploy an actions on google app. To summarize the steps, they are
Design a conversation
Create a project and define actions
Build a fulfillment service
Test the actions
Prepare for deployment and submit.
Thanks for staying with me. Hope this was helpful. Feel free to reach out if you have questions. You can comment here or reach out to me via twitter @thisisananth
No comments:
Post a Comment
Comments